Welcome to my blog, the Gratutitous Gas Gun Geek. I originally started this blog to follow my attempts at building from scratch a WA M4, but it has since evolved into many other projects in the gas airsoft world. Watch me customize some airsoft replicas to look unique. I also do gas airsoft repairs and custom projects as well. Contact me for pricing and options!

Friday, January 25, 2013

Gas Rifle Review - Magpul ACR GBBR kit

Welcome back, and I've got a little bit of a surprise for you all today.  Since I poke around Gasguns.info more and more now, I like to look around at the different sales some people have.  Needless to say, I never thought I would be paying as little as I did for one of these.  Time for a complete overview of the Magpul PTS Masada/ACR with a Beta Project Gas Blowback Conversion Kit.


Let me start off by saying this, I do not actually have a 'complete' Masada.  The person I bought it from did not include the AEG parts.  I have held the AEG though, and it is a rock solid build.  A little heavier than a standard M4, all of the enhancements in ergonomics make up for it.  The rifle is very intuitive, making for an easy transition from the M4/M16.  In the airsoft world, the Masada and ACR have always had been a sort of 'Gucci' item for me.  The Magpul PTS ACR weighs in with a hefty $450-$500 price tag for an AEG.  The only other AEGs at that price point were G&P M4's with more tactical rails and accessories than a mall ninja would take.  With promises that this would be 'your last AEG you needed to buy', the ACR was to be a highly adaptable carbine.

The gas blowback conversion kit is made by a company known as Beta Project.  They have appeared first by cloning PMAG's for AEGs, and have evolved into making Western Arms M4 accessories.  Their lastest addition is the officially licensed Gas Blowback Conversion kit for the ACR.  This kit will not fit on the $250 licensed A&K clone.  It requires the $500 Magpul PTS Masada/ACR.  I will be calling this rifle the ACR, since it has all the improvements that Bushmaster made before releasing it as the ACR.

Time for the review!

Initial Impressions
Let's start this review off right, this gun is ROCK SOLID.  I could not find wobble anywhere on this gun.  At first, I thought there was a little with the barrel assembly, but if you ratchet the handle for the barrel nut it completely eliminates it.  I have the FDE version, and the color of the aluminum upper and polymer furniture match well together.  Some people couldn't even tell the difference when I first showed them.  The trademarks are engraved into the receiver and molded into the plastic.  Magpul even got clever by used its own logo as the texture for the grip areas.  I also want to note that this gun is extremely light.  I doubt I could ever go back to my M14's 11 lbs with this thing around.  I do not have a scale or method to measure, but it is less than a metal bodied M4, so I would say 5.5-6.5 lbs.  When punching out the pins to field strip (covered later), it is very difficult to do on some parts of the rifle.  Keep a dummy bullet around, as it will help push those stubborn pins out.


Stock(s)
The fixed stock that comes with the gun is extremely well build.  It feels like a nylon reinforced polymer, but is much denser than other composites by other companies.


It has an adjustable cheek piece, which has two different heights.  While to me it doesn't seem like too much of a difference, those who run optics might like the enhancement.  It only adds about a half an inch (1/2") of height adjustment.  You can adjust it by pulling the piece to the rear, pulling it up all the way, the pushing it back forward to lock it in place.  For comparison, a SCAR type rifle simply uses a push button.  I normally keep it in the lower position, even when I'm not using full face protection.


There are a number of ways to attach a sling loop.  There are two slots in the top rear, and bottom rear positions for looping through with a cloth sling.  There is a quick detach stud hole just below the top slot for a QD sling mount which permits 360 degrees of rotation.  It can be moved to the right side by unscrewing an allen bolt (hex bolt).  The last point is an HK style loop where the receiver meets the stock.  This is a nicely cast steel part and feels solid on the gun.  Again, it can be placed on the right side by removing two allen bolts on the other side.  The removable sling mounts have not been touched on my rifle since I am a right handed shooter, but they are probably loctite'd into place anyway.


(Notice in the last picture there is the retaining screw missing from the QD mount.  I do not know when or where I lost it, but it is easy to replace with one from the hardware store)

The rubber on the recoil pad is nice.  It doesn't grip too much, but still offers solid locking into the shoulder.  It is quite thick, and can be removed by two allen bolts.


My only compliant with this stock is the open space in the back.  It would have been nice to have a door assembly bolted in to store parts or batteries, but oh well.  I guess it lightens up the gun.  It looks as though the door assembly from the similar Magpul UBR stock would fit, but there are no mounting points for it.


In order to swap out stocks, you need to punch out the self retaining pin that holds the upper onto the lower and break it open much like an AR15/M16/M4.  Then you can punch out the second retaining pin below that, and lift the stock out of the lower.  As of the time of this post, there are three stock options for the ACR.  The one that comes with the gun is a fixed length.  For around $90 you can purchase the adjustable one (featured in many pictures and video games), seen below.


The adjustable stock has seven (7) different positions to adjust the length of pull.  The length can be shorter than the fixed stock (when fully collapsed), longer than the fixed stock (fully extended), or 5 positions in between.  The adjustable cheek riser is retained (but cannot be adjusted without moving the stock out one position), as are a majority of the sling mounts.  The only one that is not kept is the one at the upper rearmost position.  I use the metal bracket next to the folder button, so it isn't an issue to be missing one sling mount.


The stock does fold to the right side of the rifle.  It retains full function even with the stock folded, but using the right side selector switch is more difficult.  This is not meant to be used for CQB.  It is intended to be folded for storage in a vehicle to decrease bulk.  If the user is suddenly attacked while disembarking, then the rifle can be shot from the hip to cover his/her teammates.  Once proper cover is reached, the stock can be unfolded to provide more accurate fire.  The stock is held to the side by the force of a spring pushing down on the mechanism in the stock hinge.  This is a much better design compared to the SCAR or G36 which use a tab sticking out of the receiver.  Likewise, the ACR's folding stock can be easily unfolded by pulling on it.  The button is made of polymer, Magpul polymer mind you, but there are numerous reports of the A&K Masada clone having that tab break.  I try to push the button in when I'm unfolding the stock to reduce the stress on it.  With the stock folded, you can see the Magpul logo adorning the back of the receiver.  The little black rubber piece is a small storage compartment to store batteries and the like.


There is one more stock option for the ACR which has recently came out in the last 6 months.  For twice the price of the folding stock (around $200), Magpul PTS has recently released the PRS, or Precision Rifle Stock, for the ACR as well.  The PRS stock has adjustment knobs for increased the cheek weld and length of pull, similar to a sniper rifle.  I do plan on picking the PRS at a later time, since it adds to the ACR's "adaptive" capabilities.

Hand Guards
This is yet another solid piece on this gun, and adds to the modularity the ACR is known for.  Being of similar design to the MOE rifle hand guards for the M4/M16, it is a light weight polymer but does not feel as sturdy.  The plastic is a little thinner, but is made of the same polymer as the stock, making it very rigid.  To remove the hand guard, simply push out a self retaining pin located at its base by a QD sling swivel stud and slide off towards the front.


As you can see, I have installed the Magpul MVG (MOE Vertical Grip).  Any MOE (Magpul Original Equipment) accessories can be mounted onto the front end of the ACR as well.  There is a polymer rail selection kit, an illumination kit for mounting flash lights and pressure pads, and two different scout mounts to cantilever flash lights even further forward.  The MVG mounts using a single allen bolt with a threaded retaining plate.  Accessories can be mounted onto the 6 o'clock, 2 o'clock, and 10 o'clock positions.  I also have the illumination kit attached.  It comes with two polymer rail pieces, one that mounts like a normal rail piece and the other is cantilevered to place the flash light forward of the hand guard to avoid the beam hitting the gun and creating a dark spot or giving away the fact you have a rifle ready to go.  I do not have a flash light yet, but the rails at least look cool for now.


There is another option for mounting accessories to the ACR.  Magpul PTS has released a fully railed aluminum hand guard.  It has rails at the 6, 9, and 3 o'clock positions.  It is a little bit shorter than the standard hand guard, but weighs twice as much.   The aluminum hand guard costs around $100, which is comparable to a quad rail for an M4.  The rails are not too sharp like some M4 rails, but the entire piece is one solid brick of aluminum.  It mounts sturdily to the rifle using the same retaining pin.  There are two small bolts that can mount to the front of the rail into the upper receiver, but I do not find them necessary.  One nice feature is the two QD sling mount points on the front of the rail for those that use a two point sling.


If you want a second polymer hand guard (for differently mounted options), you can get a replacement for around $35.  I have actually seen users who own the real Bushmaster ACR buy the Magpul PTS hand guards and mount them to the real deal.  Makes you wonder if the PTS stuff is actual Magpul polymer or not.

Barrel
Something that easily separated the ACR from any other rifle before it was the quick change barrel.  This feature remains on the airsoft version as well.  To remove the barrel, lock the bolt to the rear and remove the hand guard.  You will see a handle underneath attached to a specially designed nut.  Push the little retaining piece in and rotate counter clock wise one quarter (1/4) turn.


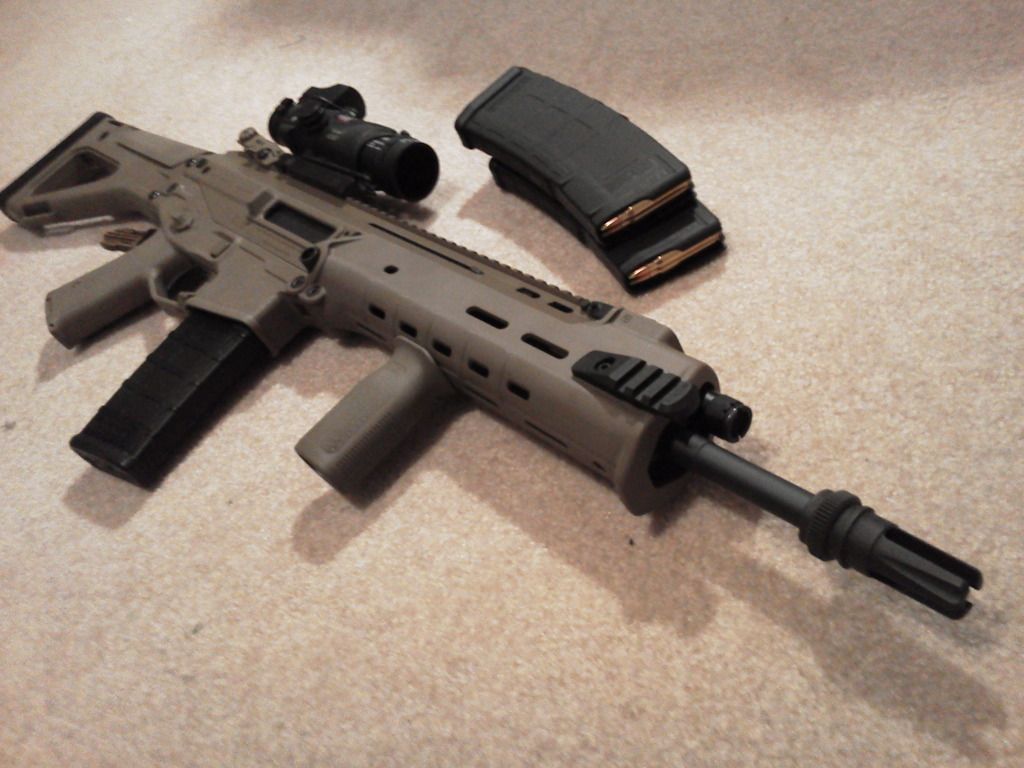
The outer barrel is machined out of aluminum, and for the gas conversion kit, uses a modified WA M4 hop up chamber.  The dimensions of the outer barrel look similar to a standard M4 one, but I doubt they are an easy swap.  It could probably be done with a machine shop or with steady hands and a dremel.  The threading on the end is 14mm clockwise, and comes with a standard A2 style flash hider.  Luckily, more companies are making 14mm positive flash hiders and adapters are readily available so this really isn't an issue.  I currently have a Magpul PTS AAC Blackout 51T three prong flash hider attached, which looks mean on the rifle.


The hop up adjustment wheel is locate on the right side of the barrel assembly, using the standard WA design.  It is very easy to access since the hand guard can be removed by pushing out one pin.  It uses a red hop up bucking, but I do not know if the barrel is a tight bore or not.


The gas system is purely cosmetic, but can be disassembled.  I would suggest keeping it on the gun though, as it helps stabilize the barrel when replacing it back into its socket.


The barrel length is the same standard M4 carbine, 14.5 inches.  This makes the inner barrel 363mm.  From my understanding, it used all standard WA gas M4 inner barrels, but I have not confirmed this since I have not opened up the unit yet.  It does appear to use the WA style hop up wheel which is accessed from the right side of the barrel instead of the bottom.

There are two additional barrel lengths available for the AEG, an 11.5in (280mm), and an 18in (455mm).  A longer polymer hand guard can be purchased for use with the longer 18in barrel, for a very decent price (~$35).  Only the 14.5in barrel is available for the gas version (one that comes with the kit), and there has been no word on other barrel lengths to become available or if the AEG ones are compatible with gas parts.  I will try to explore this further to add some more options to my own ACR.

Upper Receiver
The upper receiver on the ACR is made of a solid piece of aluminum, which has been anodized to match perfectly with the rest of the polymer components.  It can be separated from the rest of the gun via 4 self retaining pins and removing the barrel.  The barrel mounting piece is different between the AEG and GBBR, and is changed by punching out two pins and removing four screws.  The charging handle assembly must also be changed out, which is done between swapping the barrel mounts.


The rifle comes with a full length top rail to mount any sort of optics and night vision devices.  It is machined very nicely, without the extremely sharp edges rails are known for.


The ACR comes with a basic set of iron sights.  The front flips up by pushing a cross pin from the left to the right.  It automatically flips up, and is a standard M4 post.  It can be adjusted for elevation using a standard M4/M16 front sight adjustment tool.  The cross pin must be pressed back manually to lock the front sight back into place.  The rear sight is a Magpul Rear MBUS (Magpul Back Up Sight) in FDE color.  I don't really like it since it obstructs my view a little bit, and the little piece that makes the aperture smaller likes to fold halfway down when the sight is flipped up.  I will be trying to sell this at one point.  I am currently looking at a set of Troy style folding sights to replace it.


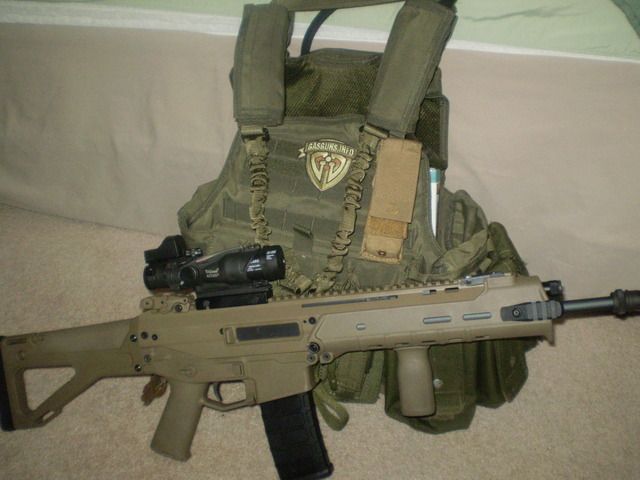
As for optics, I am looking at two different options.  I really like the ACOG.  The 4x magnification allows for better judgement of targets out at further ranges.  I can add a set of back up iron sights on top or a Doctor Optic style of micro red dot on top for faster target acquisition.  On the other hand, another optic choice I have grown used to is the dual optic or "hybrid sight".  Using an EOTech XPS-2/3 as a close range optic, a magnifier is used behind it to effectively make it a scope.  The magnifier is flipped out of the way to allow the EOTech to be used without magnification.  If I play my cards right, I should be able to get both.  I would use the ACOG as a DMR type optic (for use with a longer barrel), and the hybrid sight for normal play.  Just the EOTech could be used alone for CQB or I could go back to iron sights.  I had a chance to try on some different sights, and I am definitely liking the ACOG look, so I bought one.  One sight down, one to go!


The charging handle can be swapped to either side.  Simply use a bullet tip or screw driver to press in the little hole at the top when the charging handle is all the way forward.  The handle when installed on the left side is angled down out of the way, and flattened for easier gripping.  The handle can be flipped in four (4) different ways.  It can be angled up or down and mounted to the left or right.  I normally keep it to the left side angled down since I am a right handed shooter.  It would be nice if there was an ambidextrous charging handle made available.
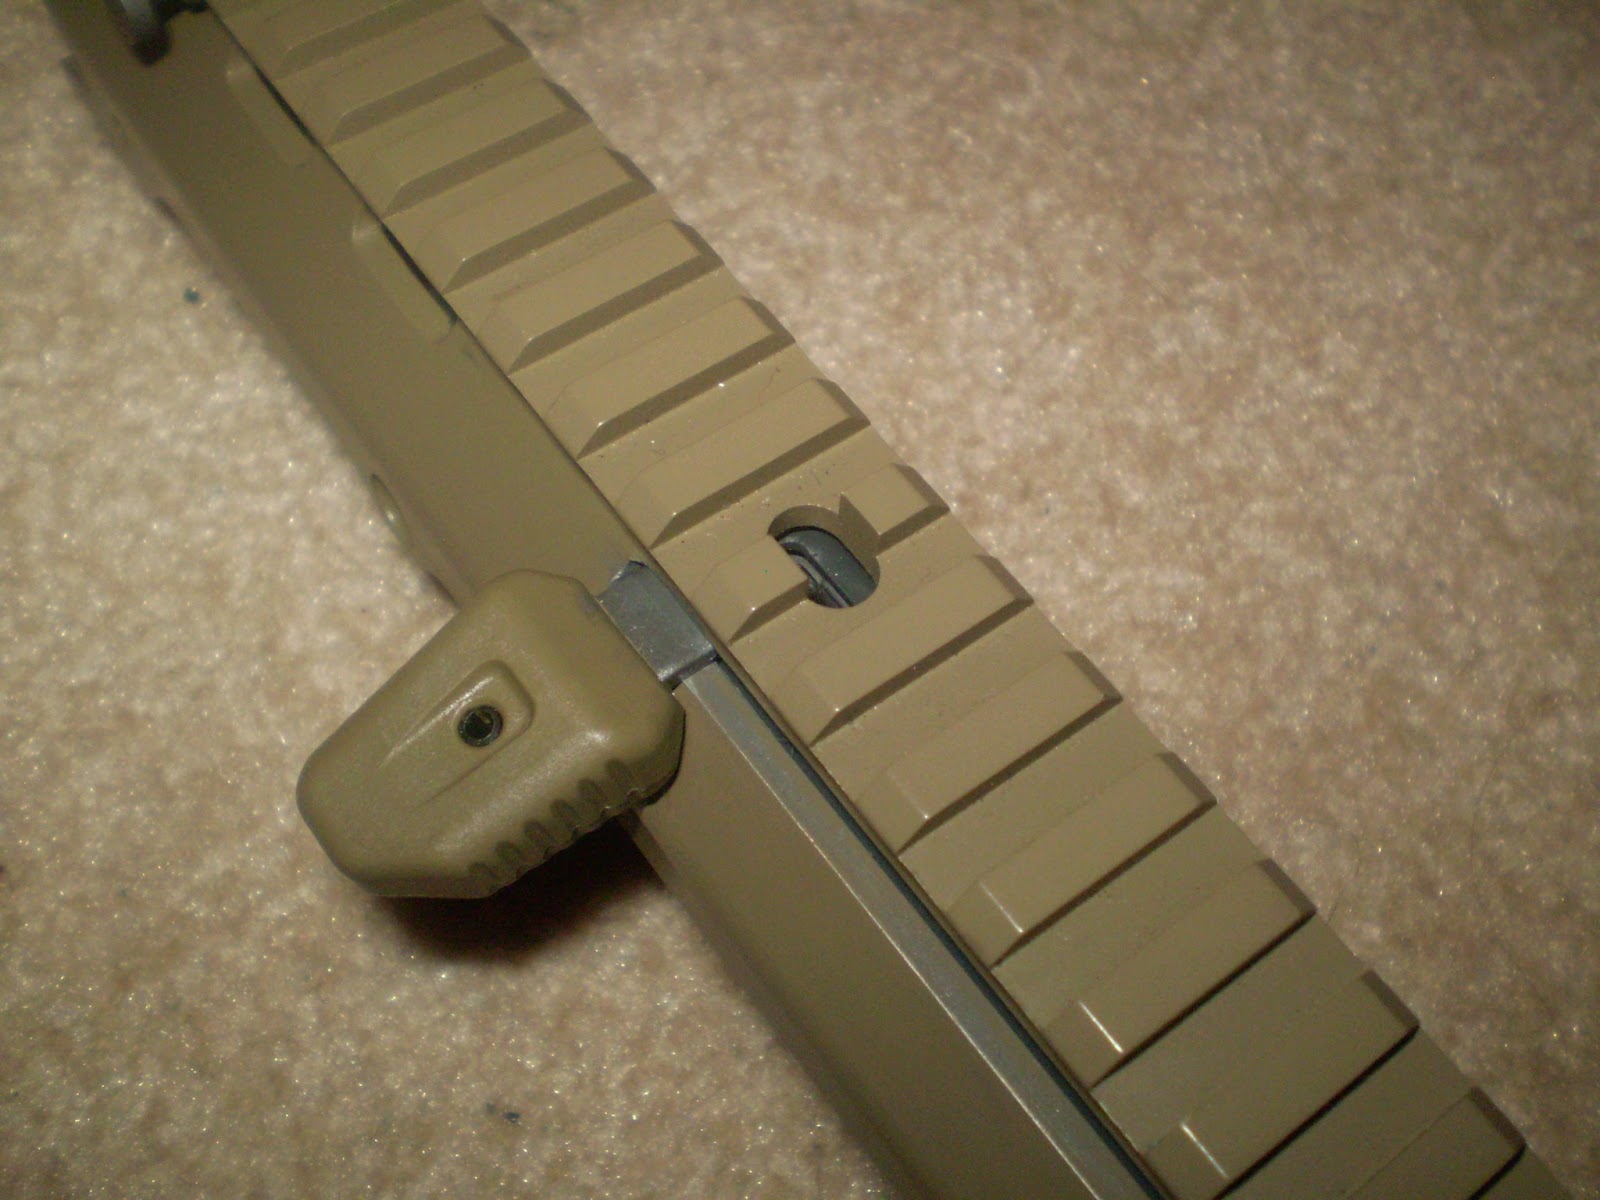


(The second picture has the charging handle on the right side)

Something that was interesting was that you will notice a few hex bolts running down the length of the upper.  These are purely cosmetic, as the bolt guides are made as one piece into the upper.  I haven't had them loosen on me yet, but I would keep an eye on them just in case.  Loctite would be practical here, making sure the bolt doesn't catch on the screws.


Bolt and Recoil Spring
By removing the retaining pin on the back of the upper receiver, the bolt and recoil spring assembly can be removed.  While the rifle is assembled, the bolt can easily move in the receiver.  When the lower is removed though, it can feel as though the bolt is sticking in the upper.  This is normal for this rifle, as the lower parts the ends of the upper to allow more free-er movement of the bolt and bolt carrier group.


By pushing the recoil spring and rotating it 45 degrees, it can be removed from the bolt carrier group (there are two pegs that need to be aligned with a slot to remove the spring).  The recoil spring has a rubber buffer to cushion the force of the bolt impacting it.  Mine has shown some wear, and pieces of it are missing.  I think this would be a pretty easy part to replace with a rubber pad cut to shape.


The bolt is not made of steel, and it probably isn't pure aluminum either.  It seems to be a very high quality build of aluminum alloy.  The design is much improved over the standard WA M4 bolt carrier, but still uses WA style loading nozzles.  The loading nozzle is removed by unscrewing a small allen screw that is used to hold in a side retaining guide, and by removing the e-clip at the rear of the bolt.  The loading nozzle feels like an ABS plastic, and will deform.  Replacements are easy to source though, as there are a number of different WA types for sale in either polycarb, aluminum, and even stainless steel.


As of now, there are no replacement bolts on the market from Beta Project or Magpul PTS.  Angry Gun is working on a fully steel bolt though.  It dramatically increases the recoil of the ACR.  The factory bolt is very well made, so it should last quite a long time already.  Mine has started to show some wear near the area that contacts the bolt release.  I am worried that this could cause problems down the road until I get a steel bolt to replace it.

One thing I have noticed using the rifle is sometimes the bolt feels rough while cycling.  If the bolt is not lubricated enough, then it will almost feel as if it is grinding against the inside of the upper.  Simply using thicker grease (like AEG gear grease or petroleum free lithium grease) on the guide rails will solve this problem.

Lower Receiver
This is where the conversion kit really shows its colors.  The lower receiver is made of the same high density polymer as the stock.  There are some surprising things inside though.  It has the feel of an M4, but has a few different changes.  It can be removed from the rest of the rifle by two self retaining pins.


Inside of it resides the fire control group, or FCG.  The FCG is made of steel and a pretty good grade, too. It locks up tight, but doesn't have any sharply machined edges.  The valve knocker has the same design of the WA M4 in the fact that you have to charge the rifle prior to inserting a mag or you could break the valve knocker.  While it is made of steel, I wouldn't want to break it or the valve stem off of a release valve.  You would think after Inokatsu's M4 and WE's M4 designs they could have developed something different.  The WE allows the knocker to shift out of the way when inserting a mag with the hammer dropped (just like in a pistol), while the Inokatsu's valve knocker retracts after it hits the valve (as apposed to needing back pressure from the valve itself).  While not a deal breaker, it is a downer.


The bolt release is famous in the ACR.  Unlike the M4, it is located in the trigger guard and can be used by the trigger finger to lock open the bolt to clear a jam or release it for a faster reload.  The piece that contacts your finger is plastic, while the actual catch itself is cast steel.  The nice thing instead of the WA design which only contacts the bolt on the right side, the ACR's catch grabs both sides of the bolt.  The bolt release is spring loaded to let the bolt fly home if the charging handle is racked, even if the gun is upside down.  The magazine release is also steel and ambidextrous, feeling very familiar to the M4.


The selector is made of the same dense plastic as the body and stock.  While it locks solidly in place, it does feel plasticy.  It rotates similarly to the M4.  Safe is horizontal with the arrow pointing towards the barrel, semi is 90 degrees vertical up, but full auto is 60 degrees more instead of another 90 degrees.  It makes the transition back from auto to semi faster, but takes some getting used to.  The selector positions are marked with bullets.  Safe has a bullet with a slash through it, semi has just a plain bullet, and full auto has a bullet being trailed by others.


There is a small little storage compartment in the pistol grip.  It can be opened by unscrewing an hex bolt (allen key) and pulling on a little retaining tab.  It has enough room for a set of batteries or a few spare parts.  I'd like to see if I could fit a spare bolt in there in case I need to make a field swap.  I do not know if the Magpul MIAD grip cores will fit.  The MIAD cores can hold a number of different things like CR123A batteries, AA/AAA batteries, and a spare bolt and firing pin, all in a waterproof case.  I will have to stop by my local shop to see if any will fit.


This lower is designed for 5.56 style magazines from the M16/M4 series.  Magpul PTS has a lower receiver for the AEG that allows it to use AK style magazines (granted, they are proprietary).  It would be a nice addition if they released an AKM lower that allowed it to use GHK AK magazines.  In a perfect world as well, they would release a set of lowers for the WE style rifles too.  The magazines for the WE are cheaper and easier to get for some people, and would really add to the ACR's capabilities.  They would need a new bolt to go with the design changes, as well as probably a new lower for the WE stuff as well.  Only time will tell if it ends up happening.  Considering there really isn't anything else for the gas conversion kit, I don't see it happening anytime soon.  Especially with KWA's announcement of their own Masada GBBR.

Performance
So how does a $500 gun perform?  Not too shabby for a stock GBBR.  The FPS is pretty consistent at just below 400 (395ish) with a 0.20g, which is perfect for outdoor play.  Coupled with the standard WA M4 nozzle and you can drop an NPAS inside of it to get it from 450-500 all the way down to 300 if you need it for CQB.

The rate of fire is a little low at around 11.5 RPS; lower than a stock AEG.  Enough to get BBs out there, but slow enough to control.  The recoil is manageable on this gun.  It kicks enough to throw off some shots and feel realistic.  The bolt locks open when it is empty, and you can tell the difference between a shot that cycles the rifle, and one with the last shot held open.

The rifle is slightly picky with magazines.  I received two different types of magazines with the rifle when I bought it.  I had 5 King Arms mags, which are easily the worst I have ever dealt with.  They leaked no matter what I did to them.  I loaded them up with a few BBs and tried them in the ACR.  The rifle would cycle just fine, but only the first BB would fire.  Every other shot would be dry firing.  The loading nozzle was fine, but it seems like the mags would be sitting too low to properly feed BBs.  I would recommend avoiding King Arms mags for gas rifles anyway.  They are made poorly in my opinion.

After I tested the 5 mags and found them all to not work, I had one little glimmer of hope.  Sitting in the box with my rifle was a Pro Win version 1 magazine.  These mags are made from a block of aluminum, and can handle the pressure of CO2 without reinforcement.  I charged it full of gas and loaded up 30 rounds.  The Pro Win fit perfectly and fed every single round, locking the bolt solidly to the rear once it was empty.  The Pro Win magazines are worth the investment, especially since they cost between $60 - $80 a piece.  There are number of users who only use Pro Win's, and I can see why now.  Mine had this little rubber Magpul base plate on it, and it allows a slightly better grip on the bottom.  If I pick up more of these Pro Wins, I'll probably get a few more base plates to tell them apart.  Pro Wins come in two different versions (1 & 2).  Version 2's are more highly sought after and better made compared to V1's, but that doesn't mean the V1's are bad.

Another magazine that works well in the ACR is the G&P PMAG.  It's CNC'd body is made of a very nice grade of aluminum, and the floor plate can use regular Magpul Ranger plates.  The mag has some wobble in my rifle, but works well in feeding and cycling.  I would recommend these since they can be had for around $50 (pretty good for a WA M4 magazine), and are designed to be durable and easily repaired.  I didn't notice that ehobbyasia.com had a video on the gas blowback conversion kit and at the end stated that Pro Win V2's and G&P PMAGs fit in the rifle.  I will agree with this statement, but haven't fully tried out other magazine options, save for the King Arms mags.


(Notice in the Pro Win V1 to the left is missing the Magpul L-plate.  I lost it in a game I was playing, but I sold the mag and replaced with with a G&P PMAG in black.)


As a final note in performance, the rifle is 100% modular.  With three different stock options, two different hand guards, four different barrels, and three different lower types the rifle can be configured from an ultralight CQB rifle, to a highly tuned Designated Marksman's rifle by punching out a few pins.  Magpul PTS has released the parts to convert a GBBR ACR back into an AEG.  In total, it probably costs about the same as buying a gas conversion to make the ACR an AEG again.  I do plan on buying the parts eventually, but it is not a priority to switch back to AEG's anytime soon.  Many of these parts can be bought overseas, and are slowly trickling into US shops.

Running the rifle through a few games has been fun.  Even with my limited funds to purchase additional magazines, I was still able to compete with AEG's in semi-auto only games.  The gun is loud, with the crack of the gas and bolt echoing through the woods.  Indoors, this gun has authority.  People were running for cover even though I was no where near them.  It definitely gets attention at the chronograph and sighting range.  During a night game I had the chance to use a night vision optic to locate a beacon.  The ACR is definitely a gun that needs some accessorizing, like an optic or light system, to add to the look and feel.


Final Thoughts
Overall, the Magpul PTS ACR is a very well built rifle.  For the brand new price of between $500 (for a GBBR or AEG) to $750 (for a base AEG version and the gas blowback conversion kit without magazines), it can be quite the purchase for a new player.  For a seasoned veteran who is looking for a new way to play the game, the ACR is literally one of the last rifles you would ever need to buy.  The modularity makes it a go to gun for any situation, and can be configured from one style to the next in less than 15 minutes.  The bolt carrier itself can be disconcerting as it is not made of steel, but if it is properly taken care of, will last.  Just like any other Western Arms M4, I do not recommend it for a new player.  This is for those who have no problem taking apart their guns to swap out parts and check up on things.

My recommendation, get the AEG first then the Gas Conversion Kit.  Gas guns are susceptible to cold weather, and being able to switch back to an electric gun would allow you to run it more often.  Like any other gas gun (especially Western Arms series guns), it is an expensive endeavor.  If you like the newest, coolest, and most tactical rifle out there, then this is the piece to polish off your collection.


Monday, October 1, 2012

Gas M4 Project #3 - The "Parts Bin" WE M4

If you belong to a few forums like I do, you find some incredible deals on parts, guns, and anything else you find.  I have been gathering some things for 'that project' or just whatever gun I feel like building.  Well, I have reached a point where it is a good time to bolt on and pin together an M4.  This gun will be a solid back up gun.  The WE M4 gas system is relatively cheap, and mags are plentiful now.  Purchasing an Open Bolt Kit gets you a good chunk of the internal parts to put together something nice.

So this project is made of parts I purchased for cheaper than usual, that does not mean it is crappy looking.  So far I have the lower receiver built up.  Here are a few pictures to kick it off.


I had a WE receiver just sitting around that had the trigger guard pin tabs broken off in the back.  I just took a real steel aluminum trigger guard and JB welded it to the receiver.  It is already broken, and the new trigger guard was $5 at a gun show.  I could paint it to match a little better, but it isn't a huge problem in my opinion.

The stock is a real steel Magpul CTR Milspec stock.  It slides across a G&P 6 position buffer tube I got with another stock I bought for the CM901 project.  I am using a real milspec diameter tube for that project, so this spare buffer tube fit well.  It has numbers on the top, but they are covered up by the CTR stock most of the time anyway.  The friction lock is kind of pointless since the stock to tube fit is extremely nice and tight.  I replaced the standard stock ring with a real steel Magpul ASAP (Ambidextrous Sling Attachment Point) sling mount.  It allows a sling to freely switch sides as you change sides with your rifle.  It was a pretty cheap part, and can really enhance your AR platform.  I had to use the commercial tube spec pin in the ASAP to keep the tube from rotating when I tightened it down.  Not a huge deal, but I noticed the threads on the G&P tube were flatter and probably needed the slightly taller pin to fit better.

I have a real Magpul MOE-K pistol grip attached.  The design of the grip is to be even smaller than the standard A2 grip on the AR15/M16, while adjusting the angle so it allows the rifle to feel more comfortable tucked in close (commonly used for short barreled rifles).  The grip has a good feel with and without gloves, and fits right to the WE receiver with a slightly tight fit.

If you noticed in the pictures, I have some really big take down/pivot pins on the lower.  Those are real steel Yankee Hill Machine EZ Pull Pins.  They are designed to be larger for your hand to grab if you swap uppers often.  I used them here since I plan on keeping this as a back up.  I could swap the lower onto any rifle I want to fix an issue in the lower receiver for the day.  Who knows, maybe one day I will just build a proper upper for this as a nice addition to my collection.

The springs and detents for the selector switch and take down/pivot pins are for a real AR15 as well.  I bought them with a little repair kit I got at another gun show, and they fit perfectly in the receiver.  The selector detent needed to be filled down on the lip so it could clear the trigger box space to engage the selector.  Luckily, the WE selector switches are extremely cheap and work well enough.

Other than that, everything else is stock WE-Tech.  Trigger box drops in cleanly, and the buffer and recoil spring work well enough to nice recoil and rate of fire.  I have no complaints with this set up, and it feels good so far.  The most expensive part was probably the stock, as I only got it today and had to pay full price for it.  Probably everything together cost $250 for this set up, which isn't bad for a custom rifle.

This project will go by quickly so keep an eye out for a post about the upper receiver.  Next post will be a review, so keep on the look out for a really sweet rifle!

Thursday, August 16, 2012

Update #1B - Mailbox Ahoy!

Hello gas gun users, this is Quad G again.  Between the last post and now, I sold a few things I didn't need (like the closed bolt assembly I had and some books) and put the money to some good use.


To really give you some background, I have been debating over my WA M4 build.  It may have been the start of this blog in the first place, but it seemed like quite the expensive undertaking.  It could well go over $1,000 with all steel components and high end parts.  For someone at my stage of life, that is quite a bit of money.  With that being said, I have a bit of advice for those out there who want to endeavor on building gas blowback rifles:  Join multiple forums.

What sits inside of this package is something I got from a forum I mention a lot in this blog, Gas Guns Info.  This isn't about that particular forum though, I belong to a number of different ones.  You make friends with people by sharing the sport and similar interests.  Because of that, friends will help each other, whether it is advice for buying parts and accessories, or maybe something they are selling for some quick cash.  This particular package is because of the latter.


The guy I bought this from bought a G&P receiver set with a VLTOR marked lower, and a MUR-1 upper.  He really only did it to get the upper.  For some reason, the VLTOR MUR is a hotly contested item of desire for builders.  Probably due to the unique, angular style of its design.  Still, the guy wanted it for the upper, so he had the lower as a spare.  Not wanting it, he offered it to me for decent price.  I simply could not resist.


The receiver is brand new, and definitely looks good.  The finish is a little rough, but it is nice and even at least.  I do not think these are laser engravings, but silk screening.  What is nice about the G&P receivers is the pins are pre-installed.  The front one is done just like a real AR15.  Push in the spring and pin, slide the pivot pin in and rotate it until it clicks.  The rear pin is done by inserting the Take down pin into the receiver, sliding the detent and spring from the rear end of the receiver.  A small allen screw then holds it in place.  Normally, you would have to install a receiver extension or buffer tube with a stock end plate to hold it in.  This makes life a little easier when swapping stocks.  I won't plan on doing that since I'll have a few lowers to swap between.  Yep, I'm planning on making a precision (fixed stock) lower with a very light trigger and full auto disabled, and a standard carbine type lower with a durable trigger.  Not sure what this one is going to be used for, but time will tell if I find a good deal on some parts.  The only other complaint is the trigger guard, it rattles quite a bit.  Don't know what I'm going to do about that, probably swap it for something else.

Well, that is it for now, the start of  Project 1!  Gas Geek out.

Friday, August 10, 2012

Gas Rifle Review - WE-Tech M14

Besides building guns, I do have to buy here and there.  I used to run a Classic Army M14 Scout as a primary for 3 years before I got rid of it.  There was nothing wrong with it, but I wanted something different.  This is where the WE M14 comes into play.  Having seen video after video, I wanted one.  I've run it a few times (unfortunately with only one magazine), but my results are ready.  On to the review!

WE Tech M14


Real Steel History
Just briefly, I will touch on the history of this rifle.  The M14 was originally intended to replace not only the M1 Garand, but the M1 Carbine, M1A1 Thompson, M3 Grease Gun, and the Browning Automatic Rifle.  This would make a universal rifle to be used with logistics easy to take care of.  The problem was, it really only replaced the M1 Garand.  It was too light for the light machine gun role (the M60 obviously did it better), and too heavy for the submachine gun role.  It didn't see combat until the early stages of the Vietnam War, which was loved by troops.  The wooden stock would swell up and cause some accuracy problems, but the power of the 7.62 NATO was evident.  It was replaced by the M16 rifle in the 1960's, and at the time it was considered the shortest lived combat rifle in U.S. history.  In modern conflicts, the M14 has been given new life as a designated marksman rifle and semi-auto sniper system in the MK14 EBR and other variations.

Initial Impressions
The box the rifle comes in is lackluster.  It is cardboard.  There is not foam at all.  There are two pieces of cardboard that hold it in place.  The entire gun comes wrapped in a massive plastic bag, which is open at one end.  Upon lifting the rifle, you can feel the massive heft of it.  The plastic stock is colored to look similar to wood, and is rock solid.  You could probably beat someone to death with this thing if you wanted.  The grey color of the metal looks like a light parkerized finish.  The magazine has this weird green color to it, which kind of disrupts the look.

The instruction manual is pathetic.  It is literally the exploded diagram with all of the part numbers.  I personally think this is because WE secretly partnered with a few different airsoft reviewers, all of which demonstrated basic functions.  Seems like a cheap tactic.  The gun is already $350 ($420 for the Evike upgraded FPS model), so a proper instruction manual would have been expected.

Features and Components

Starting with the front, you can see the blaze orange tip.  It takes up most of the muzzle brake, but it does not cover the front sight (which I have seen on a few replicas happen).  It is held in by the famous castle nut, and a small allen screw underneath the front sight post.  I have not taken it off since I like the style, but I wish the orange part would have been smaller.  I guess it is more labor to mask off a part than paint the whole thing.


Next up is the gas block.  WE paid attention to the details quite well.  You can unscrew the front end, and remove a weak spring.  A fake,  metal piston will then fall out.  If you take the stock off and cycle the action, the piston moves in and out as well.  A neat little feature I must say.  The plug had a tendency to unscrew itself due to the recoil, so I put an o ring in it and it hasn't moved since.


Moving to the rear section of the gun, we have the butt plate.  It is hinged like a Vietnam era M14, and contains storage for small parts if need be.  My gun came with a speed loader, a small allen key for adjusting the hop up, and 30 round conversion for the magazine.  I swapped it in, so the parts you see are for converting the magazine back to 20 rounds.


Typical Garand style rear sight (which I love).  Elevation is extremely easy to adjust, windage not so much.  No trademarks or anything on the receiver, but RA-Tech makes a steel replacement  with markings.


 Interesting thing to note is the fact the bolt does not actually replicate the action like the real steel.  It only travels maybe 75% of the way to the rear.  This is because the real steel bolt tilts as it travels back into the receiver, while the WE M14 one does not.  There is however a rubber buffer at the back to cushion the bolt instead of allowing it to slam into the receiver.  The bolt has a cover on top of it that rotates like the bolt on the real steel, but the loading nozzle stays were it is and just travels rearward after blowback.


If you notice to there is a strange looking lever located on the right side above the trigger.  This is your fire selector.  You need to rotate it 180 degrees to switch between semi-auto and full-auto.  There is an 'A' stamped on one side, and need to be facing the stock when you want to use full auto.  All the lever simply does it shift the disconnector away from the hammer.  Full auto works well though.  I haven't had a single jam in the 1,000 rounds I've fired (Remember, this is a gas rifle, not an AEG).  The hooked bar is a full auto sear of sorts.  The hammer is held back until the bolt fully closes.  If this was not here, the hammer would just drop causing either premature gas expulsion or the firing pin would not have enough energy to open the valve and the gun would have to be cycled.  Simply removing the hooked bar and the selector assembly makes it a semi-auto only rifle.


Something I was upset about is the bolt catch.  It works fine, and I like it, but the button on the left side of the receiver is what irks me.  It works the opposite of the real steel.  Instead of pulling the bolt back and pressing that button to lock it, it does nothing.  If the bolt locks back after an empty magazine and new magazine is inserted, you can hit that button and release the bolt.  I have not done this to my rifle since it is asking for the catch to wear down.  I pull on the charging handle enough to release the catch, and let the bolt fly home.  RA-Tech does have parts to fix this and make it real steel functionality, but I would have personally liked it coming from the factory.


Disassembly is similar to the real deal.  Pull on the trigger guard to rotate the locking system open.  The trigger assembly simply lifts out, notice the spring stuck into the stock.  This is the trigger return spring.  If it falls out, make sure to keep track of it.  To continue the field strip, lift the action out of the stock and set it aside.  You don't need to disassemble further, as this is a very clean rifle for some reason (the real steel was, too).


The trigger is really nice for a GBB rifle.  The WA's that I've handled feel like they have 5-6 lbs triggers, which is accurate to the real steel factory trigger.  The WE M14 has a really smooth trigger.  I have not measured it, but it feels to be around 4 lbs and breaks cleanly.  It has a little bit of over travel, but doesn't have too heavy of a spring to really throw your shots off.  The trigger grouping looks very close to the real steel, disconnector and all.  The pins have a tendency to slide out when you move the parts outside of the stock.  I had to reassemble the magazine release twice because I was messing with it separate from the stock.  Just push them back in if you see them starting to move out.  The safety is typical of the Garand.  It clicks into place only when the hammer is locked back for firing.


The nozzle is plastic, but is housed in a metal bolt.  The nozzle itself does not rotate, but the top cover does.  As I said before, a rubber buffer prevents the bolt from slamming into the back of the receiver.  There is not roller on the hammer, so you can see the wear marks on the bottom of the metal.


The hop up adjustment screw is located on the right side of the receiver, directly underneath the auto sear.  This is not an ideal position, as the gun has to be disassembled partially to adjust.  No quick field adjustments for this gun.


WE apparently makes a nice low profile scope mount for this gun.  You can see it attached to the side of the receiver.  You have to remove the stripper clip guide to do it though, but luckily the mount comes with a pin punch to knock out the retaining pin.  The mount slides right in, and you have your choice between a hex screw, or the older style knob with a flat cut out.  Cost of this mount was $30, and I've only been able to find it overseas.  I have a Tasco 2-7x38mm scope mounted on high or very high rings.  You will need them to clear the receiver and rear sight.


Being a gas blowback rifle, gas is pressed into the magazine along with BBs.  If you do not have a speed loader to quickly and easily load, you can force them in by hand.  Be careful though, as I noticed that you need to insert them at an angle, not straight up or down.  The magazine fits 20, but using an included conversion it can be changed to 30 (more on that later).  There is not way to disable the bolt hold open on the magazine, unless you remove the pieces internal to its function.


It needs to be 'rocked' into the magazine well, like an AKM or FAL.  Since the magazine weighs close to a fully loaded real steel magazine, it might take some getting used to the weight.  The color does not match the rest of the rifle for some reason, and is the weird green.  It doesn't really matter that much, but would be nice if it matched the grey, parkerized look of the rest of the rifle.  The brass fill valve is in the bottom through the floor plate of the magazine.  The magazine can be inserted into the gun even when the trigger is pulled and the hammer has already fallen (unlike WA M4's).


The front locking tab is not fixed in place, so you could technically slide the magazine into the well.  I think this just helps the rocking motion should you not be perfect with the 'rock and roll'.  It does have wobble, but it locks into place once you get used to the way it locks up.


The magazine feels quite hefty since it contains everything to make it function.  This mag uses WE's split design rather than the stupid and horribly designed gasket mounted to the back of the magazine.  The o ring will be easy to replace or swap out since it held between the two pieces by two phillips head screws.  Simply pop off the floor plate, unscrew the phillips head closest to the front of the magazine, and slide out the internals, making sure you don't lose the two piece linkage to activate the bolt catch.  The magazine is originally 20 rounds, but comes with a replacement spring to convert it to 30 rounds.  Unscrew the screw near the top of the magazine (making sure not to send the spring flying across the room when you pull off the cover), remove the spring and a little black piece that restricts the round count.  Replace with the longer spring, and put the cover and screws back in.  All done.


Design Issues

Nope, you read that right.  I have a few complaints about this rifle.  They are short though, not too much to be honest.

First of all, the receiver has play in the stock.  You can shift it forward and backward about an eighth of an inch.  It does not affect the function, but it can be bothersome occasionally.  I have heard that with minimal modification, a real stock can be fitted, which eliminates the wobble.  I will be trying this at some point, hopefully with a VLTOR M1A stock, or a nice wooden one dated for the 60's.


Second, the trigger box will split.  That is right, not maybe, but will.  After around 1,000 rounds, my trigger started to break differently.  I pulled off the trigger group to discover the tan colored piece lifting off of the main, parkerized colored one (seen pictured below).  RA-Tech makes a steel, one piece (the other side still must be screwed on, but that part is already stable) trigger box for $100.  While you don't need it right away, be prepared to grab one at some point in the gun's life.


Thirdly, like stated above, the hop up is difficult to adjust on the fly.  Much like the TM designed M1911's, partial disassembly is required.  This is unwieldy for an 11 pound gun, but if you bench the gun to sight it in like you should, it is a minor inconvenience.  Set it and forget it.

Fourth, the upper hand guard is made of the cheapest looking plastic on Earth.  It does not match the stock at all, and makes the gun look cheap.  I believe real steel ones will fit with minimal modification, and I will be pursuing this as well.


Lastly, the stock itself.  While it does have a sturdy build, it is HEAVY.  There is supposed to be a weight buried inside of the plastic somewhere to add to the realism.  Add a scope and mount like I have, not to mention a bipod (it has a hole for the Harris style stud) and you have a 15 pound gun.  That gets tiring with a full kit of magazines to maneuver on the field.  At least the folding butt plate can keep it on your shoulder after a full day of running around.

Performance

So does this gun perform like older WE pistols and the Closed Bolt AWSS Gas System?  Nope, this gun rocks.  I got the Evike upgraded nozzle, which says it shoots 500 feet per second.  When I chrono'd this gun with .20 gram BBs, I was getting 495-525 FPS.  The standard version is supposed to shoot around 400 FPS.  This gun is built for hitting at long ranges.  With some .25 gram G&G BBs, I was getting 150 feet on a man sized target without even adjusting the hop up!  If you turn the hop up on, and use .30 gram + BBs, you will easily have a 200~225 foot gun with a stock barrel.  Barrel length is 22 inches, or 540mm.  I have no doubt you can have an extremely accurate gun if you swap out the barrel for a 6.03 tightbore.

Gas efficiency is surprising.  WE is known for having 1:1 or less in terms of having enough gas to shoot the entire magazine and lock open.  The magazine is huge, and gets 3 magazines off if loaded with 20 rounds, and 2 mags if 30.  This was test was done by firing 10 rounds in semi auto, then 3-4 round bursts until the mag was empty (waiting about 1 second between pulls of the trigger).  Cool down isn't too bad, but the mag can get chilly.

Recoil is like nothing else.  It did not seem to be as much as the WE M4 (which kicks around a lot), the M14 has so much mass moving around.  The kick feels like a .22 magnum.  The action cycling makes the sort of distinctive noise of the real M14.  Those who are familiar with the 'cling' of the rotating bolt and operating rod will know what I'm talking about.  The rate of fire is similar to the real one, around 650-700 rpm.  Full auto is not difficult to control, but will throw your shots off unless you are supported.

Upgrades

There are a number of different things you can do to your WE M14 to make it better.  Here is a simple list:

1) RA-Tech parts
RAT makes a steel trigger pack (selling all of the individual components as well), a steel receiver, real wood stock, and some other miscellaneous parts.  They also make a 'real function' bolt catch.  Two pieces replace the one part in the gun.  This can turn your bolt release into a bolt catch.  FPS can be adjusted using the standard WE NPAS made by RAT, but modifications need to be made to fit it.  RAT makes a conversion kit for the barrel and front sight to make your full sized M14 into a SOCOM16.  A 540mm 6.01 tightbore is available from them (also made of steel), and to top it all off you can buy a pre-upgraded version with the upgraded parts installed.  There are different 'levels', so you can determine your needs for upgrades.  Prices for complete rifles range from $600-$1,200.

2) VSR-10 Hop Up Buckings
You read that right, the hop up bucking in the WE M14 is the same as its TM compatible M1911 and its VSR-10 sniper rifle.  A stock replacement can be had for $10, but high end buckings can go for $30+.  Recent offerings include A+ bucking and REAPS bucking, which can extend the range another 100 feet reportedly.

3) Real Steel parts
I haven't tried this yet since my bills have been piling up lately, but reportedly a real steel M14/M1A stock can be fitted to the WE M14.  Minor filing may or may not be required.  The advantage of this is it makes the gun lighter.  The WE is not made of 100% steel, so WE made the stock to have some weight in it to bring it up as close as possible.  The real stocks don't have this and can save somewhere around a full pound or two of weight, that means less heft to move around and allows you to toss an extra mag in your kit.  A real wood stock and polymer heat shield also can give the gun a nicer look.  I've seen a few walnut stocks that look fantastic.

Those are pretty much the upgrades.  Ranging from cheap fixes to buying a second mortgage, your WE M14 can be tricked to whatever you desire.  There are a few things WE was supposed to offer, but still haven't come about in the two years of the guns release.  CO2 mags would make even higher velocities to come screaming out the muzzle and allow for colder temperature ranges of use.  WE has not really made a well built CO2 magazine, so I don't expect anything spectacular if it does get released.  The M14 is not the only rifle in their line up to not get a CO2 mag, the M4/SCAR is the only one despite promising ones for the AK after it was released.  WE has released an EBR variation that is official licensed by Sage International.  Two versions are now out, one with the sliding stock and adjustable cheek riser, and one with an M4 buffer tube known as 'Mod 1'.  Both are in the $400+ range if bought separately from the rifle.  A complete EBR is in the $700 price range.

Conclusion

So is this gun worth it?  Considering a basic load out of the gun plus 4-5 extra magazines can approach $500, this rifle is not an inexpensive venture.  That being said, if you are looking for something different to hit at longer ranges, this is the thing for you.  While it may not get used during winter time, when the weather gets above 50 degrees F this thing puts spring sniper rifles to shame.  Run heavy weight BBs and some green gas and you will have a good time.  Be prepared to drop some money though, the gun needs regular maintenance and some upgrading.  If you are not used to opening up guns and repairing them, don't start gas blowback rifles.  You will be paying even more for techs to do the upgrades for you.  The WE-Tech M14 is a great out of the box long range shooter.  While heavy in weight and cost, the gun performs well.  Add a scope, bipod, and disable full auto for a semi-auto sniper system that can compete with heavily upgraded bolt actions.

Thanks for looking into my review.  I hope it gives people a better perspective on this gun before buying it.  Gas Geek out.